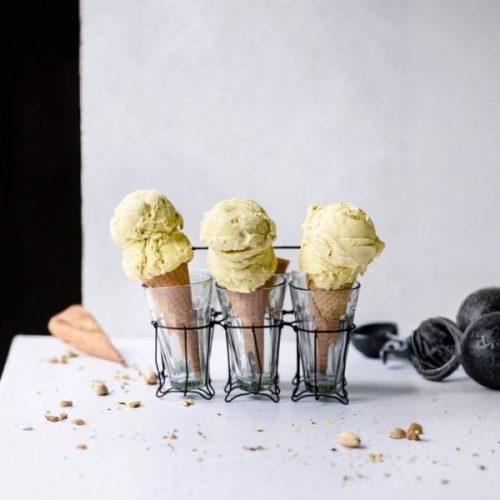
Creamy Pistachio Ice Cream
Indulge in a creamy, nutty pistachio ice cream made from scratch with simple, wholesome ingredients. This recipe transforms raw pistachios into a smooth paste and combines it with a rich custard base, resulting in an irresistibly smooth and flavorful frozen treat perfect for home enjoyment.
Equipment
- 1 Food processor or high-powered blender
- 1 Heavy-Bottomed Saucepan
- 1 Whisk
- 1 Ice Cream Maker
- 1 Immersion blender (optional)
Ingredients
- 1 cup raw unsalted pistachios
- 3/4 cup granulated sugar divided
- 2 cups heavy cream
- 1 cup whole milk
- 1/2 teaspoon salt
- 2 teaspoons vanilla extract
- 4 large egg yolks
Instructions
- Preparing the Pistachio Paste: Begin by shelling 1 cup of raw, unsalted pistachios if they are not already shelled. Place the pistachios into a food processor or a high-powered blender. Add 1/4 cup of the granulated sugar to the nuts. Pulse the mixture on high speed repeatedly, stopping occasionally to scrape down the sides. Continue this process until the pistachios and sugar transform into a smooth, thick paste. This paste forms the essential flavor base of your ice cream, so take your time to ensure it is well ground and creamy, without large chunks. Once done, set the pistachio paste aside to use later in the recipe.
- Beating the Egg Yolks: In a clean, medium-sized mixing bowl, crack 4 large eggs and carefully separate the yolks, placing them in the bowl. Add 1/4 cup of the remaining granulated sugar to the yolks. Using a whisk or electric mixer, beat the egg yolks vigorously until they become pale yellow, fluffy, and slightly thickened. This aeration process is crucial to create a custard that is light and smooth. Set this mixture aside while you prepare the cream base.
- Heating the Cream and Milk Mixture: In a heavy-bottomed saucepan, pour the whole milk (1 cup), 1 cup of the heavy cream, and the remaining 1/4 cup sugar. Add 1/2 teaspoon of salt to enhance the flavors. Place the pan over medium heat and stir frequently to dissolve the sugar completely and prevent the milk from scorching on the bottom. Use a candy or instant-read thermometer to monitor the temperature carefully. Heat the mixture until it reaches about 180°F (82°C), which is hot enough to create a custard base but not boiling. Stir gently and constantly to ensure even heating.
- Tempering the Egg Yolks: To avoid scrambling the eggs, you need to temper the yolks. Slowly pour about one-third of the hot cream and milk mixture into the beaten egg yolks while whisking vigorously and continuously. This gradual mixing raises the temperature of the eggs gently, preventing them from curdling. Once combined, pour the tempered yolk mixture back into the saucepan with the remaining heated cream and milk. Return the pan to low heat.
- Cooking the Custard: Cook the combined mixture over low heat, stirring constantly with a heat-resistant spatula or wooden spoon. This step requires patience and attention, as the custard must thicken slowly without overheating. The custard is ready when it thickens enough to coat the back of a spoon and holds a clear line when you run your finger through it. This process usually takes about 5 minutes. Be careful not to let it boil or scramble.
- Incorporating Pistachio Paste and Flavoring: Remove the custard from the heat immediately once thickened. Add the remaining 1 cup of heavy cream, 2 teaspoons of pure vanilla extract, and the prepared pistachio paste to the warm custard. Stir gently but thoroughly to combine all ingredients evenly. If you find that the mixture has small lumps or chunks from the pistachio paste, use an immersion blender or transfer it back to a blender and pulse a few times until the texture is luxuriously smooth and creamy.
- Cooling the Ice Cream Base: Pour the finished pistachio custard mixture into a long, shallow container. This shape increases surface area, allowing the mixture to cool more evenly and quickly. Cover the container tightly with plastic wrap or a lid. Place it in the refrigerator and chill for at least 6 hours or overnight. For those short on time, chilling in the freezer for 3–4 hours is an alternative, but slower, gentler refrigeration produces the best texture.
- Churning the Ice Cream: Once the mixture is thoroughly chilled, pour it into your ice cream maker, following the manufacturer’s instructions for your specific model. Churn the mixture until it thickens and reaches a soft-serve consistency, typically about 20–30 minutes depending on your machine. This process incorporates air and prevents large ice crystals, creating a smooth, creamy texture.
- Freezing the Final Product: Transfer the churned ice cream into a freezer-safe container with a tight-fitting lid. Smooth the surface with a spatula, cover, and freeze for at least 6 hours or overnight to allow the ice cream to fully set. This hardening time ensures the ideal scoopable texture when serving.
- Serving and Enjoying: When ready to serve, remove the ice cream from the freezer and let it sit at room temperature for a few minutes to soften slightly for easier scooping. Scoop generous portions into bowls or cones and enjoy the rich, nutty flavor and creamy texture of your homemade pistachio ice cream.
Notes
- Using raw, unsalted pistachios ensures the freshest, most natural nutty flavor without added salt or oils that can alter the taste.
- Be patient when making the custard; low and slow cooking prevents curdling and creates a silky texture.
- Tempering the egg yolks properly is crucial to avoid lumps or scrambled eggs in your ice cream base.
- Chilling the ice cream base thoroughly before churning is key to achieving smooth, creamy results.
- For an ultra-smooth texture, blending the pistachio paste fully into the custard is recommended—an immersion blender works perfectly here.
- Homemade ice cream typically tastes best after freezing overnight to allow flavors to meld and texture to set firmly.