
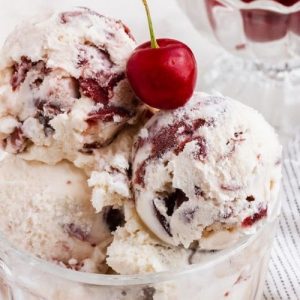
This luscious Cherry Vanilla Ice Cream combines creamy richness with bursts of sweet, juicy cherries, creating a dessert that feels indulgent yet homemade.
Naturally sweetened with honey and lightly spiced with vanilla, it offers a satisfying treat with moderate protein from dairy and antioxidants from cherries.
Perfect for quick dessert prep or weekend indulgence, this recipe is simple, refreshing, and ideal for families or entertaining.
Creamy Cherry Vanilla Ice Cream
Equipment
- 1 Ice cream maker (chilled, 4–6 cups capacity)
- 1 large mixing bowl
- 1 Small mixing bowl
- 1 whisk
- 1 Loaf pan or shallow container
- 1 Plastic wrap or wax paper
Ingredients
- 2 cups heavy cream
- 1 cup whole milk
- ½ cup + 1 tablespoon granulated sugar divided
- ¼ cup honey
- 1 tablespoon vanilla extract
- ¼ teaspoon kosher salt
- 15 oz. can of cherries about 1.5 cups, drained and roughly chopped
Instructions
- Prepare the Ice Cream Bowl – Chill Thoroughly: Before you begin, make sure your ice cream maker’s bowl is completely frozen. Ideally, place it in the freezer for at least 24 hours. You’ll know it’s ready when you shake the bowl and hear no liquid sloshing inside. A thoroughly chilled bowl ensures your ice cream will churn smoothly and develop a creamy, soft-serve texture without forming ice crystals.
- Combine Creamy Base Ingredients – Mix to Perfection: In a large mixing bowl, pour 2 cups of heavy cream and 1 cup of whole milk. Add ½ cup of granulated sugar, ¼ cup honey, 1 tablespoon of vanilla extract, and ¼ teaspoon of kosher salt. Using a whisk, gently but thoroughly blend the ingredients until the sugar is completely dissolved and the mixture looks smooth and homogenous. This is the foundation of your creamy ice cream, so take your time to ensure it is perfectly combined.
- Prepare the Cherry Topping – Sweeten the Fruit: In a small bowl, place the drained cherries from your 15-ounce can. Roughly chop the cherries into bite-sized pieces for an even distribution throughout the ice cream. Sprinkle the remaining 1 tablespoon of granulated sugar over the cherries and stir gently. Let the cherries sit for a few minutes so they release a little juice and become lightly sweetened. This step intensifies the cherry flavor and ensures they don’t freeze too hard in the final ice cream.
- Churn the Ice Cream Base – Transform into Soft-Serve: Pour the prepared cream mixture into your chilled ice cream maker. Start the machine according to the manufacturer’s instructions. Allow it to churn for about 20 minutes, or until the mixture thickens to a soft-serve consistency. During this process, the cold air and continuous motion incorporate air into the ice cream, making it light, creamy, and smooth. Keep an eye on the texture—it should be soft but hold gentle peaks when lifted with a spatula.
- Fold in Half the Cherries – Distribute Flavor Evenly: With the ice cream still churning, add half of your sweetened cherry mixture during the last two minutes. Allow the machine to mix the cherries gently into the ice cream. This step ensures that the cherries are evenly dispersed, giving every bite a burst of fruity flavor while maintaining a creamy consistency. Avoid adding all the cherries at once, as it can affect the churning and texture.
- Layer and Swirl Remaining Cherries – Create Visual Appeal: Transfer the churned ice cream into a shallow container or loaf pan. Dollop the remaining cherries on top, and using a spatula or a spoon, gently swirl them into the ice cream. This creates attractive streaks of cherry throughout the dessert, enhancing both the look and taste. Press a layer of plastic wrap or wax paper directly onto the surface to prevent ice crystals from forming during freezing.
- Freeze Until Firm – Achieve Perfect Texture: Place the container in the freezer for at least 4 hours, or until the ice cream is fully set. Freezing slowly allows the ice cream to firm up while preserving its creamy texture. Avoid leaving it uncovered, as this may result in a grainy surface. This step is essential for achieving a smooth, scoopable ice cream that melts perfectly in your mouth.
- Serve with Ease – Bring to Room Temperature: When ready to serve, remove the ice cream from the freezer and let it sit at room temperature for about 5 minutes. This short resting period softens the ice cream slightly, making scooping easier and ensuring a luscious, creamy texture in every spoonful. Serve in bowls or cones, and enjoy the perfect combination of vanilla creaminess and cherry sweetness.
Notes
- Ensure both the ice cream maker bowl and the ice cream base are extremely cold before starting for the creamiest texture.
- If using fresh cherries, let them sit with sugar for a few minutes to soften and release natural juices.
- Honey can be substituted with agave syrup or corn syrup if desired.
- Avoid over-churning, as it can affect the smoothness of the ice cream.
- Always press plastic wrap or wax paper directly onto the ice cream surface before freezing to prevent ice crystals.
- For best results, consume the ice cream within two weeks for optimal flavor and texture.
Chef’s Secrets: Insider Tips for Perfection
The secret to irresistibly creamy ice cream lies in both technique and timing.
Chilling your ingredients and ice cream bowl overnight creates a denser, silkier texture.
Adding cherries in two stages—half during churning and half for swirling—ensures even distribution while maintaining beautiful visual appeal.
Whisking the cream mixture until fully blended before churning is crucial, as undissolved sugar or uneven honey can affect smoothness.
For an extra flavor boost, lightly macerate fresh cherries with a teaspoon of lemon juice to enhance their natural sweetness and prevent browning.
Serving Suggestions: Creative Ways to Enjoy
Cherry Vanilla Ice Cream shines as a standalone treat, but you can elevate it with simple pairings.
Serve with warm chocolate sauce, crushed cookies, or a drizzle of balsamic reduction for a sophisticated twist.
Fresh fruit or toasted nuts add crunch and color, while a sprig of mint enhances presentation.
This ice cream also works beautifully in dessert sandwiches, milkshakes, or as a topping for pies and cakes.
Its creamy texture and fruity bursts make it a versatile dessert for family dinners, parties, or casual weekend indulgence.
Storage Tips: Keep Ice Cream Fresh
Store your ice cream in an airtight container to prevent freezer burn and maintain a soft, creamy texture.
Press plastic wrap or wax paper directly onto the surface before sealing the lid. Ideally, consume within two weeks for best flavor and texture, although it can last up to a month in the freezer.
If ice crystals form, let the ice cream sit at room temperature for 5–10 minutes before scooping, or briefly stir with a spatula to restore its creamy consistency.
Frequently Asked Questions
1. Can I use fresh cherries instead of canned?
Yes! Fresh cherries can be used, but allow them to macerate in sugar for at least 10–15 minutes to release natural juices and soften, ensuring even sweetness and texture throughout the ice cream.
2. What can I substitute for honey?
Agave syrup, corn syrup, or even maple syrup can replace honey in equal amounts. Each will slightly alter the flavor, so choose based on your taste preference.
3. Can I make this without an ice cream machine?
Absolutely. Pour the mixture into a shallow, freezer-safe container and stir vigorously every 30–45 minutes during freezing until the ice cream reaches a creamy consistency. This prevents large ice crystals and mimics the churned texture.
4. How long should I churn the ice cream?
Churning typically takes about 20 minutes, depending on your machine.
Stop when the mixture thickens to a soft-serve consistency, and remember that it will firm further in the freezer.
5. Can I make this ahead of time for parties?
Yes, this ice cream can be made a day or two in advance.
Freeze in an airtight container and bring to room temperature for 5–10 minutes before serving. It keeps its creamy texture well if properly covered.