
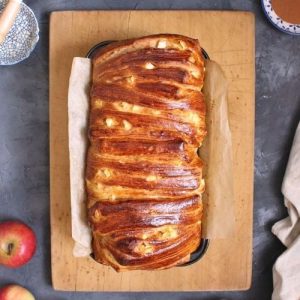
Indulge in the warm, comforting flavors of this Apple Cinnamon Pull-Apart Bread, a perfect balance of sweet apples, aromatic cinnamon, and tender, buttery dough.
Packed with fiber from fresh apples and protein from eggs and milk, this loaf offers a wholesome breakfast or snack option.
Easy to prepare and satisfying, it’s ideal for everyday baking or meal prep.
Apple Cinnamon Pull-Apart Bread
Equipment
- 1 large mixing bowl
- 1 Loaf pan (9×5 inches)
- Baking paper or butter for greasing
- Whisk
- Knife for chopping apples
- Rolling Pin
- Clean tea towel or cling wrap
Ingredients
Pull-Apart Bread Dough:
- 180 ml Full Cream Milk
- 12 g Instant Yeast Powder
- 50 g Brown Sugar
- 400 g Plain Flour
- 1 tbsp Cinnamon Powder
- 1 pinch Salt
- 2 Eggs
- 60 ml Melted Butter
Apple Cinnamon Filling:
- 1 Large Apple peeled and diced
- 1 tbsp Brown Sugar
- 1 tbsp Cinnamon Powder
- 20 g Butter softened
Glaze:
- 1 Egg
- 1 tbsp Full Cream Milk
Instructions
- Prepare the Yeast Milk: Begin by gently warming 180 ml of full-cream milk. The milk should be warm to the touch—similar to body temperature—but not hot enough to burn your finger. Pour 1 tablespoon of brown sugar into the milk and sprinkle in 12 grams of instant yeast. Stir lightly and leave the mixture to rest for 5–10 minutes. You’ll know the yeast is active when bubbles form on the surface and a faint yeasty aroma rises.
- Combine Dry Ingredients: In a large mixing bowl, sift or mix together 400 grams of plain flour, 1 tablespoon of cinnamon powder, the remaining 2 tablespoons of brown sugar, and a pinch of salt. Ensure the ingredients are evenly distributed to create a uniform dough base.
- Add Wet Ingredients: Make a well in the center of the dry ingredients. Crack in 2 eggs and pour in 60 ml of melted butter. Gradually add the prepared yeast milk. Using a wooden spoon or your hands, begin combining the ingredients until a rough dough forms.
- Knead the Dough: Turn the dough onto a lightly floured surface.Knead it thoroughly by hand for 8–10 minutes or until the dough becomes smooth, elastic, and slightly tacky but not sticky.You should be able to stretch it without tearing, indicating proper gluten development. (Alternatively, use a stand mixer with a dough hook for 5–6 minutes.)
- First Proofing: Place the kneaded dough into a clean bowl lightly dusted with flour. Cover it with a clean tea towel or lightly greased cling wrap. Allow it to rise undisturbed in a warm environment for 1.5 hours, or until it has doubled in size. The dough should feel soft, airy, and spring back gently when pressed.
- Prepare the Apple Filling: While the dough is proving, peel and dice 1 large apple into small cubes. In a small bowl, combine the apple pieces with 1 tablespoon brown sugar, 1 tablespoon cinnamon powder, and 20 grams of softened butter. Mix until the apple cubes are evenly coated in the cinnamon-sugar mixture. Set aside.
- Roll Out the Dough: Once the dough has doubled in size, punch it down gently to release excess air. Lightly flour your working surface and roll the dough into a large rectangle, approximately 12×18 inches. Aim for an even thickness to ensure uniform baking.
- Add Butter Layer: Spread the softened butter evenly across the rolled dough rectangle, leaving a small margin around the edges. The butter creates a rich, tender texture and helps the apple filling adhere.
- Layer the Apple Cinnamon Filling: Evenly distribute the prepared apple cinnamon mixture across the buttered dough. Press the filling lightly to ensure it sticks and is evenly spread for consistent flavor in every bite.
- Cut Dough Strips: Using a sharp knife or pizza cutter, cut the dough into 4–6 long vertical strips. Stack the strips on top of each other carefully, keeping the filling intact. Then, cut this stack horizontally into 4–5 equal sections. Rotate each stack 90 degrees so that the layers of dough and filling stand upright—this will create the signature pull-apart effect.
- Arrange in Loaf Pan: Line a loaf pan (9×5 inches) with baking paper or generously grease it with butter. Gently place the stacked dough sections into the pan, arranging them evenly without overcrowding. This arrangement ensures the bread rises uniformly and creates distinct pull-apart sections.
- Apply Glaze: In a small bowl, whisk together 1 egg and 1 tablespoon of full-cream milk. Brush this mixture evenly over the top of the dough stacks.This glaze will give the bread a beautiful golden shine and a slightly crisp crust.
- Second Proofing: Cover the loaf pan with a clean tea towel and let the bread rise again in a warm spot for 1–1.5 hours, or until the dough reaches the top of the pan. This final proof ensures a light, airy texture in the baked bread.
- Preheat Oven: While the bread is finishing its second rise, preheat your oven to 180°C (350°F). Make sure the oven is fully heated before baking to achieve even cooking and a golden-brown crust.
- Bake the Bread: Place the loaf pan in the preheated oven and bake for 25–30 minutes. The top should turn a rich golden brown, and the bread should sound hollow when tapped gently. For an extra check, insert a skewer into the center; it should come out clean.
- Cool Before Serving: Once baked, remove the bread from the oven and let it cool in the pan for 10–15 minutes. Carefully transfer it to a wire rack to cool completely. Cooling prevents the bread from becoming soggy and allows the layers to set, making it easy to pull apart.
- Serving Suggestion: Slice and serve warm or at room temperature. This bread pairs beautifully with a cup of tea, coffee, or even a dollop of yogurt. Enjoy the tender, cinnamon-spiced layers with sweet apple bites in every pull-apart section.
Notes
- Always use slightly warm milk for activating yeast. Too hot will kill it, and too cold will slow rising.
- Fresh apples with a firm texture, like Granny Smith or Honeycrisp, work best—they hold their shape while baking.
- Kneading by hand develops gluten slowly, giving the bread a soft yet structured texture. Stand mixers save time but check dough consistency carefully.
- Ensure the dough doubles in size during both proofs. Patience here directly affects the final fluffiness.
- Brush the glaze evenly for a shiny, golden crust, but don’t let it drip down the sides to avoid burning.
- Use a sharp knife when cutting strips to avoid tearing the dough or displacing the filling.
Chef’s Secrets For Perfect Pull-Apart
The key to a show-stopping pull-apart bread lies in balancing layers and timing.
For soft, tender layers, ensure the butter is at room temperature, not melted, so it spreads smoothly without soaking the dough.
When stacking dough strips, handle gently to preserve air pockets; these pockets expand beautifully in the oven, creating the classic pull-apart effect.
For an extra flavor boost, lightly toast the cinnamon before mixing it into the filling—it enhances the spice aroma.
Lastly, resist cutting the bread too soon after baking; letting it cool slightly ensures clean layers and prevents a gummy texture.
Serving Suggestions For Maximum Enjoyment
This Apple Cinnamon Pull-Apart Bread is versatile: serve warm for breakfast or brunch with a pat of butter or a drizzle of honey.
For a dessert twist, top slices with whipped cream or a scoop of vanilla ice cream.
It pairs perfectly with coffee, chai, or hot chocolate for cozy mornings or afternoon treats.
For a lighter snack, enjoy a single pull-apart portion with yogurt or nut butter—fiber-rich apples and protein from eggs make it surprisingly satisfying.
Storage Tips For Long-Lasting Freshness
Store the bread in an airtight container or tightly wrapped in plastic wrap to maintain softness for up to 2–3 days at room temperature.
For longer storage, freeze the bread in individual slices or as a whole loaf for up to a month.
Reheat gently in a 150°C (300°F) oven or microwave for 20–30 seconds to restore warmth and tenderness.
Avoid refrigerating the bread; this can dry it out and diminish its delicate, pull-apart texture.
Frequently Asked Questions
1. Can I use different apples?
Yes! Firmer apples like Gala or Braeburn are also suitable. Softer varieties may turn mushy, but will still provide sweetness.
2. Can I make this bread vegan?
Absolutely. Replace milk with a plant-based milk and butter with a vegan alternative. Use a flax or chia egg substitute to maintain structure.
3. How can I make it extra fluffy?
Ensure the dough is kneaded well and given sufficient proofing time. Using bread flour instead of plain flour also increases gluten, resulting in a softer, airy texture.
4. Can I prepare it in advance?
Yes, you can assemble the dough and apple filling, then refrigerate overnight after the first proof.
Let it come to room temperature and complete the second proof before baking.
5. Can I add extra flavors?
Definitely! Sprinkle chopped nuts like walnuts or pecans into the filling for crunch, or add a pinch of nutmeg for a deeper autumnal flavor.
A light glaze of powdered sugar and milk can also add extra sweetness.